
Main Courses
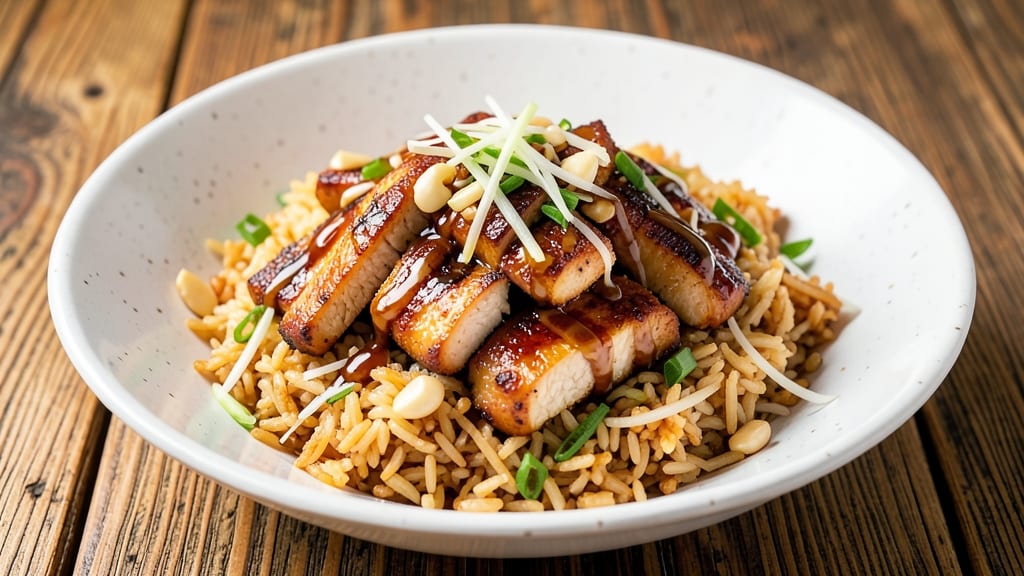
This chicken fried rice recipe no egg transforms leftover rice into a restaurant-quality dish with bold garlic-ginger flavor and satisfying crunch. 🌟 The secret lies in perfectly stir-frying chicken and aromatics before combining with rice, using just a touch of cornstarch to bind instead of eggs.
I've perfected this version after years of adapting my grandmother's classic recipe to suit dietary preferences without sacrificing texture or flavor.
The foundation of great fried rice starts with cold, day-old rice that won't turn mushy. We'll build layers of flavor with garlic, ginger, and soy sauce, then add tender chicken pieces that stay juicy through the high-heat wok toss.
The cornstarch trick creates that signature crispy texture without needing eggs, making this version equally satisfying for everyone at the table. This method delivers restaurant-quality results in under 30 minutes.
What you'll end up with is a vibrant, savory dish packed with tender chicken, perfectly cooked rice, and aromatic vegetables. The garlic-ginger zing cuts through the richness while the wok-tossed texture creates that addictive crunch.
Each bite delivers a perfect balance of umami from the soy sauce, freshness from the aromatics, and satisfying chew from the rice. This is comfort food at its finest—simple ingredients elevated through technique.
Serve immediately with traditional sides like cucumber salad or scallion pancakes for a complete meal experience. The leftovers reheat beautifully, making this an excellent make-ahead option for busy weeknights. Let's create this flavorful, egg-free fried rice that brings restaurant quality to your home kitchen.
Ingredients for chicken fried rice recipe no egg
Cold rice, tender chicken, and aromatic vegetables transform into restaurant-quality fried rice with crispy texture and bold garlic-ginger zing.
| Ingredient | Amount | Notes |
|---|---|---|
| Day-Old Cooked White Rice 🍚 | 4 cups | Cold, preferably from 1-2 days prior |
| Boneless Chicken Breast 🍗 | 1 ½ lb | Cut into 1-inch cubes, boneless skinless preferred |
| Extra-Virgin Olive Oil 🫒 | 2 tbsp | For high-heat stir-frying |
| Garlic Cloves 🧄 | 6 cloves | Minced finely for aromatic depth |
| Fresh Ginger 🌿 | 2 tbsp | Finely grated, fresh preferred |
| Low-Sodium Soy Sauce 🥢 | 3 tbsp | Kikkoman preferred for authentic flavor |
| Cornstarch 🌾 | 2 tbsp | For crispy texture without eggs |
| Carrots 🥕 | 1 cup | Diced into small, even pieces |
| Green Onions 🧅 | ½ cup | Sliced thinly, white and green parts |
| Sesame Oil 🫒 | 1 tsp | Toasted for aromatic finish |
| Vegetable Oil 🫒 | 1 tbsp | For additional high-heat cooking |
| Salt 🧂 | ½ tsp | Diamond Crystal kosher preferred |
| Black Pepper 🌶️ | ¼ tsp | Freshly ground for best flavor |
The chicken breast is critical here—cut into even 1-inch cubes for consistent cooking. Day-old rice is non-negotiable; fresh rice turns mushy under high heat. For the best flavor, Kikkoman soy sauce is my go-to, but any low-sodium variety works. Fresh ginger and garlic should be minced finely—a microplane works wonders for quick prep. If you're short on time, pre-chopped frozen stir-fry veggies save effort without sacrificing texture, though fresh carrots and green onions add superior crunch. The Diamond Crystal kosher salt
No fresh ginger? Powdered ginger at half the amount works in a pinch, though fresh delivers superior depth. For the chicken, substitute tofu or shrimp for a different protein profile—just adjust cooking time accordingly. The sesame oil should be toasted in the final step for maximum aroma; don't skip this. Cornstarch is the secret weapon here, creating that signature crispy texture without eggs. If you're concerned about gluten, ensure your soy sauce is tamari-based. For extra umami, add 1 tsp of fish sauce (if vegetarian, use 1 tsp of soy sauce + 0.5 tsp of mushrooms powder), though this version intentionally keeps it vegetarian. This dish reheats beautifully—best served immediately for peak texture, but leftovers keep for 3-4 days in the fridge. For meal prep, store components separately (rice, chicken, veggies) and assemble when ready to eat. Freezes for up to 3 months though texture may soften. To maintain crispiness, reheat in a wok or skillet over medium-high heat with a splash of sesame oil. The cornstarch coating releases moisture during reheating, so expect slightly softer edges. For extra crunch, toast the rice in the wok for 1-2 minutes before adding other ingredients.
Why You'll Love This Recipe
- One-Pan Magic: I swear by this for nights when I don’t want to wash a second pan. The olive oil and garlic sizzle in one skillet while the chicken cooks through—no flipping, no fuss—then the rice gets tossed right in. That’s it. Done.
- Ginger-Garlic Punch: Between us, the fresh ginger and minced garlic in this version are chef’s kiss. The ginger adds this bright, zesty kick that cuts through the richness of the chicken, while the garlic? It’s the kind of aromatic that makes your whole kitchen smell like a wok house.
- Lunchbox Hero: Honestly, this is my go-to for meal prep because it reheats like a dream. Pack it cold for lunch or microwave it later—it stays moist, the chicken stays tender, and no one complains about soggy rice. (Yes, even on a Tuesday night.)
- Budget Win: I can stretch a single chicken breast and a cup of rice into two solid servings without breaking the bank. Plus, using day-old rice means I’m not wasting leftovers—I’m repurposing them into something crave-worthy. Minimal ingredients, maximum satisfaction.
Step-by-step instructions for chicken fried rice no egg recipe
Master this wok-tossed technique for restaurant-quality texture without eggs.
🔥 Step 1: Prep Chicken and Create Crispy Cornstarch Coating
Cut the 1.5 lb boneless chicken breast into 1-inch cubes—uniform size ensures even cooking. In a bowl, combine the chicken with 2 tbsp cornstarch, 0.5 tsp salt, and 0.25 tsp black pepper. Toss until every piece is fully coated; this creates that signature crispy exterior without eggs. Let the seasoned chicken rest for 5 minutes while you prep the remaining ingredients.
Here's the thing—cornstarch works better than flour for this recipe. It creates a delicate, lacy crust that stays crispy through the stir-fry. Don't skip the resting time; it helps the coating adhere better and prevents the chicken from releasing moisture too quickly when it hits the hot oil.
🍳 Step 2: Stir-Fry Chicken Until Golden and Fully Cooked
Heat 1 tbsp vegetable oil in a wok or large skillet over medium-high heat until shimmering. Add the chicken in a single layer and let it sear undisturbed for 2-3 minutes until the bottoms develop a golden crust. This initial sear locks in juices and builds flavor. Flip the chicken pieces and cook for another 2-3 minutes until they reach 165°F internally.
Don't overcrowd the pan—work in batches if needed. You'll know the chicken is ready when it releases easily from the pan and has a deep golden color. Remove the chicken to a plate and tent loosely with foil to keep warm. The residual heat will finish cooking it gently while you prepare the rice and vegetables.
👨🍳 Step 3: Sauté Aromatics and Prepare Vegetables
In the same wok, add 2 tbsp extra-virgin olive oil and heat over medium-high heat until just smoking. Add the 6 cloves minced garlic and 2 tbsp finely grated fresh ginger, stirring constantly for 30 seconds until fragrant—this is where the garlic-ginger zing comes alive. Add the 1 cup diced carrots and stir-fry for 2 minutes until they begin to soften but still retain some crunch.
Real talk: the garlic should sizzle and turn golden almost immediately. If it burns, you're going too hot. Reduce heat slightly if needed, but keep it moving. The carrots should get a slight char on their edges—that adds depth of flavor. Push the vegetables to one side of the wok to make space for the rice.
🥘 Step 4: Combine Rice and Sauce for Perfect Texture
Add the 4 cups day-old cooked white rice to the wok, breaking up any clumps with your spatula. Drizzle in 3 tbsp low-sodium soy sauce and toss everything together vigorously for 1-2 minutes until the rice is heated through and begins to develop small crispy edges. The rice should look dry but slightly glossy from the soy sauce.
This is the moment that matters: day-old rice is crucial. Fresh rice turns mushy from the moisture. The slightly dry texture creates that perfect wok-tossed crunch. If the mixture looks too dry after tossing, add 1-2 tablespoons of water to help the sauce cling to everything.
⏰ Step 5: Finish with Green Onions and Sesame Oil
Return the chicken to the wok and toss everything together for 1 minute to heat through and distribute flavors evenly. Stir in the 0.5 cup sliced green onions and remove from heat. Drizzle with 1 tsp toasted sesame oil and toss one final time—this adds that aromatic finish that makes the dish sing.
Serve immediately while the rice is still hot and the edges are crispy. The garlic-ginger aroma should be intense, and each bite should deliver a perfect balance of tender chicken, slightly crispy rice, and vibrant vegetables. If you have leftovers, store them in the fridge for up to 2 days—they reheat beautifully in a skillet with a splash of water.
Pro Tips For Making Chicken Fried Rice Recipe No Egg
- CRISPY CHICKEN FIRST: Cook the chicken until it hits 165°F and develops a golden crust—don’t stop at just cooked. I used to pull it early, and it’d turn rubbery when the rice absorbed all the moisture. A quick sear in olive oil (1-2 minutes per side) locks in flavor and texture before it even touches the rice.
- CHOP GINGER SMALL: Dice the ginger into 1/8-inch pieces—no need for juliennes or matchsticks. I learned this the hard way: big chunks burn before they infuse, while tiny pieces melt into the oil and rice without overpowering. (Yes, even if you’re impatient like me.)
- STIR-FRY RICE IN BATCHES: Divide the rice into two piles and cook them separately—crowding steams the rice instead of crisping it. I was skeptical until I tried it: the first batch gets properly toasted, and the second doesn’t turn into a soggy mess. Works especially well with day-old rice.
- USE COLD RICE, NOT WET: Spread the day-old rice on a tray and let it sit uncovered for 10 minutes before stir-frying—this dries the surface slightly. I skip this when I’m lazy, but the dish is noticeably better when I don’t: the rice absorbs flavors instead of turning into glue. (Your future self will thank you.)
Wine and beer pairings for this chicken fried rice recipe no egg
Crisp White Wine
For this garlic-ginger fried rice, I reach for a dry Riesling from Germany or a Sauvignon Blanc from New Zealand. The crisp acidity cuts through the richness of the soy sauce and chicken while complementing the bright ginger notes.
A glass of Chateau Ste. Michelle Riesling—lightly sweet with citrus undertones—pairs beautifully with the dish's savory-sweet balance. 🍷
Light Beer Options
A Japanese lager like Asahi Super Dry or Sapporo enhances the dish's umami profile without overpowering it. The clean, crisp finish mirrors the fried rice's texture and highlights the garlic-ginger zing. For a craft option, try a Belgian witbier like Hoegaarden—its citrusy coriander notes echo the ginger's freshness. 🍺
Asian-Inspired Sake
If you're feeling adventurous, serve with dry sake like Dassai 23 or Kubota Junmai. The subtle sweetness and clean finish elevate the dish's aromatic complexity.
Chill the sake slightly before serving to enhance its crispness. A small glass (about 2-3 oz) pairs perfectly with each serving of fried rice. 🍶
Non-Alcoholic Pairings
For a refreshing non-alcoholic option, try sparkling jasmine tea chilled with a splash of lemon. The effervescence cleanses the palate between bites, while the floral notes complement the ginger. Alternatively, a cucumber-mint infused water with a pinch of salt enhances the dish's freshness without alcohol. ✨
Regional Adaptations
In Southern China, where fried rice originated, locals often pair it with lightly brewed green tea to balance the dish's richness. For a Japanese-inspired meal, try genmaicha—its toasted rice aroma harmonizes with the fried rice's texture. Each pairing reflects the dish's regional roots while enhancing its flavors. 🗺️
Wine and Beer Storage Tips
Store your white wine in a cool, dark place (or fridge) until serving—fried rice should be enjoyed immediately after cooking. For beer, keep cans or bottles upright in the fridge to maintain carbonation.
If using sake, store the bottle upright in the pantry until opening, then refrigerate after. Proper storage ensures each sip complements the dish's vibrant flavors. ❄️
Nutrition facts
Frequently asked questions
Why does the recipe use cornstarch instead of eggs?
Cornstarch creates a delicate, crispy coating that mimics egg's binding effect without adding richness. It also dissolves quickly in the hot wok, creating that signature fried rice texture. Plus, it's gluten-free and works perfectly with the high-heat stir-frying method!
Can I use fresh rice instead of day-old rice?
Fresh rice contains too much moisture and will turn mushy when stir-fried. For best results, use cold, day-old rice that's slightly dry. If you're short on time, spread freshly cooked rice on a tray and refrigerate for 1 hour to remove excess moisture.
What if I don't have a wok? Can I use a regular skillet? A large nonstick skillet or cast-iron pan works perfectly. Just
How can I make this vegetarian?
Swap the chicken for 1.5 lbs of extra-firm tofu (pressed and cubed) or 1 lb of shrimp. For tofu, press it for 30 minutes first to remove excess water, then coat with cornstarch and stir-fry until golden. Adjust cooking time for shrimp - they cook in about 2-3 minutes instead of chicken's 5 minutes.
Why does my fried rice turn out dry or pasty?
This usually happens from too much stirring or not enough heat. Keep the heat at medium-high and toss quickly - the rice should only need 1-2 minutes total in the wok. If it looks dry, add 1-2 tablespoons of water and toss immediately. For pasty texture, make sure your rice is cold and slightly dry before cooking.