
Main Courses
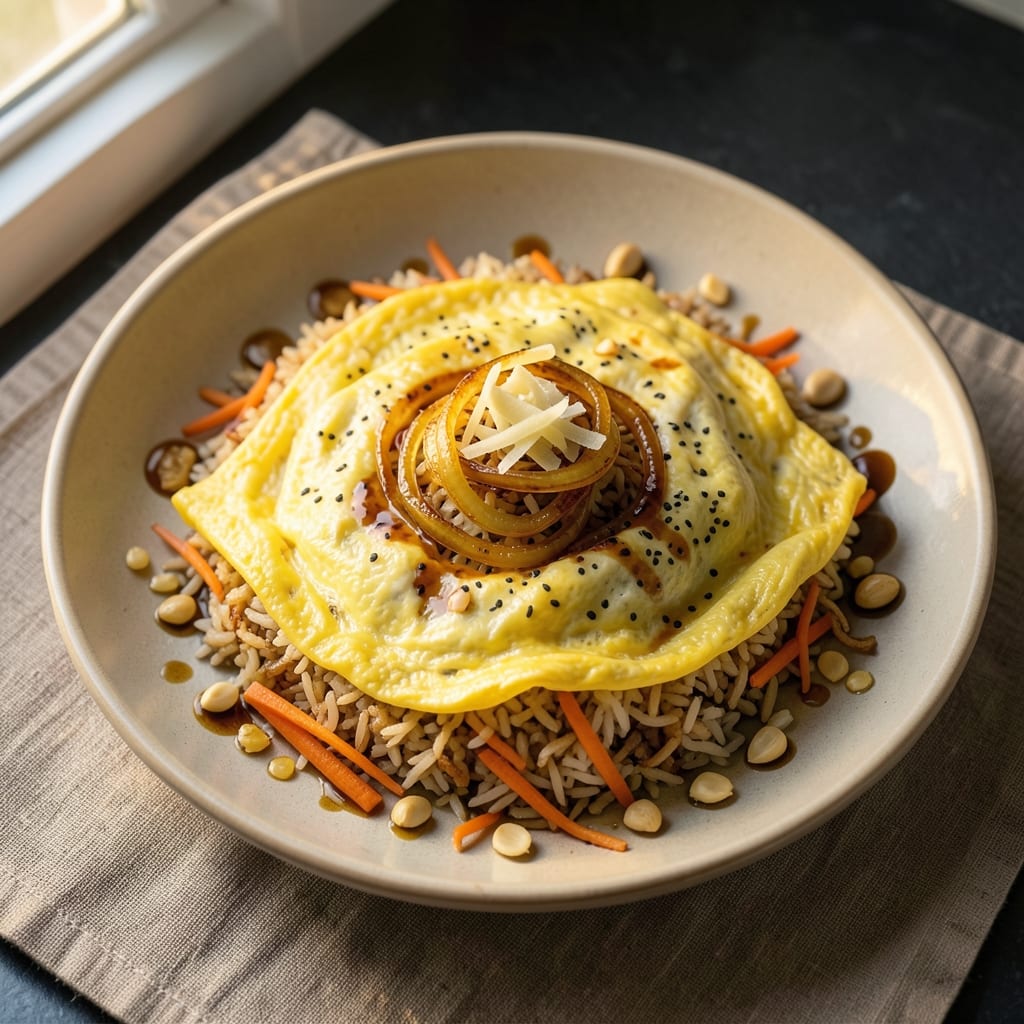
This Arashi fried rice recipe delivers the perfect balance of crispy egg bites, tender rice, and savory umami flavors that make every bite irresistible. The secret lies in high-heat stir-frying and a precise technique that transforms day-old rice into golden, textured grains with a satisfying crunch. I've refined this recipe over countless weeknight dinners, ensuring it's foolproof while delivering restaurant-quality results at home.
The foundation starts with perfectly cooked rice—slightly dry and separated for optimal texture—sautéed with aromatic vegetables and protein until fragrant. What sets this apart is the crispy egg bites, formed by carefully rolling scrambled egg into small cylinders that develop a golden crust when fried. These bites add a delightful contrast to the tender rice and vegetables, creating a dish that's both visually appealing and packed with flavor.
By the time you're done, you'll have a plate of fried rice with perfectly balanced components: crispy egg bites that shatter with each bite, tender rice grains with a slight chew, and vegetables that retain their vibrant colors and crisp texture. The umami depth comes from soy sauce, dashi, and a touch of mirin, creating a sauce that coats every grain without overpowering the natural flavors of the ingredients.
This recipe works beautifully as a main course for any meal, whether you're feeding a family or treating yourself to a comforting homemade dinner. The technique is adaptable—swap in your favorite protein or vegetables—while maintaining that signature crispy texture and rich umami flavor that makes Arashi fried rice a standout dish. Let's get cooking!
Ingredients for arashi fried rice
Perfectly balanced ingredients transform simple rice into restaurant-quality Arashi fried rice with crispy egg bites.
| Ingredient | Amount | Notes |
|---|---|---|
| Day-Old Cooked White Rice 🍚 | 4 cups | Cold, slightly dry and separated |
| Large Eggs 🥚 | 4 whole | Freshly beaten for egg bites |
| Vegetable Oil 🫒 | ½ cup | High smoke point for frying |
| Yellow Onion 🧅 | 1 medium | Thinly sliced for aromatics |
| Carrots 🥕 | 2 medium | Julienned into thin strips |
| Garlic Cloves 🧄 | 4 cloves | Minced for aromatic depth |
| Chicken Breast 🍗 | 1 lb | Boneless, skinless, diced |
| Dashi Powder 🍜 | 1 tbsp | For authentic umami depth |
| Soy Sauce 🥢 | 3 tbsp | High-quality, preferably Japanese |
| Mirin 🍶 | 1 tbsp | Sweetens without overpowering |
| Sesame Oil 🌰 | 1 tsp | Toasted for finishing aroma |
| Green Onions 🧅 | 4 whole | Thinly sliced for garnish |
| Salt 🧂 | 1 tsp | Kosher or sea salt |
| White Pepper 🌶️ | ½ tsp | Freshly ground for subtle heat |
The rice is non-negotiable—day-old, cold, and slightly dry for that ideal texture. Lundberg or Calrose varieties work best due to their stickiness when cooked. If you must use fresh rice, spread it on a tray and refrigerate for 2+ hours to dry it out. For the eggs, cold eggs from the fridge scramble more gently, giving you those perfect crispy bites. The chicken should be pre-cooked and diced—raw chicken will overcook in the stir-fry. Trader Joe's often has pre-diced chicken that saves prep time.
No dashi powder? Instant miso paste or dash of fish sauce adds umami depth. Substitute mirin with equal parts sugar and water, though you'll lose some complexity. The sesame oil is crucial for aroma—toasted sesame oil from Kikkoman or La Choy delivers the best flavor. For extra crunch, add 1/4 cup crushed peanuts at the end. The green onions can be swapped for scallions or chives, though green onions have the perfect balance of mild onion flavor and freshness.
Store any leftovers in an airtight container for up to 3 days—the flavors actually meld better overnight. Reheat gently in a skillet with a splash of water to restore crispiness. For meal prep, portion into containers with the egg bites on top to maintain their texture. The fried rice reheats beautifully, though the egg bites may lose some crunch—toast them fresh when ready to serve for maximum crunch.
Why You'll Love This Recipe
- No Chopping Chaos: I swear by this recipe because it’s the only fried rice I make when I’m too tired to dice a million veggies. Just dice the onion and carrots once—that’s it—and you’re done. The rest? Stir, scramble, and let the eggs and day-old rice do the work.
- Crispy Egg Magic: That perfect runny yolk pooling over the fluffy rice? Chef’s kiss. Crack the eggs into the hot wok first, let them sizzle into golden edges, then toss in the rice—it soaks up the richness like a dream. Honestly, this is the only fried rice that makes me forget takeout exists.
- Leftover Hero: Between us, I always have leftover rice. This recipe turns it into something actually useful instead of sad, dry scraps. Double the batch, reheat it the next day—it’s still crispy, still flavorful, and still the star of my lunch.
- Budget Breakthrough: Onions, carrots, eggs, and rice? That’s it. No fancy sauces, no specialty ingredients, just solid, reliable flavor that won’t break the bank. I’ll be real: this is the kind of meal that lets me stretch groceries without sacrificing taste.
Step-by-step instructions for Arashi fried rice
This method delivers restaurant-quality texture—crispy egg bites and perfectly seasoned rice every time.
Prepare the Chicken and Egg Bites
Cut the 1 lb chicken breast into ½-inch cubes—small, even pieces ensure quick cooking and even seasoning. In a bowl, toss the chicken with 1 tbsp soy sauce, ½ tsp salt, and ¼ tsp white pepper. Let it marinate for 10 minutes while you prep the rest.
In a separate bowl, beat the 4 whole large eggs until frothy but not fully emulsified—just enough to create soft curds. Heat 2 tablespoons vegetable oil in a nonstick skillet over medium heat. Pour the eggs into the pan, tilting to form a thin, even layer. Cook for 2-3 minutes until the bottom is set and the edges begin to crisp. Flip gently and cook another 1-2 minutes until just set. Remove and set aside, then repeat with the remaining egg mixture. The egg bites should be golden brown and slightly crispy on the outside while remaining tender inside.
Sauté Aromatics and Chicken
Increase the heat to medium-high and add the remaining 3 tablespoons vegetable oil to the same skillet. Add the thinly sliced yellow onion and julienned carrots, cooking for 3-4 minutes until the onions soften and the carrots begin to caramelize. Push the vegetables to one side of the pan and add the minced garlic cloves, cooking for 30 seconds until fragrant—don’t let it brown or it’ll turn bitter.
Add the marinated chicken to the pan and cook for 4-5 minutes until no longer pink in the center. Sprinkle 1 tbsp dashi powder and 1 tbsp mirin over the chicken, stirring to coat evenly. The dashi will deepen the umami flavor, while the mirin adds a subtle sweetness that balances the savory notes. Remove the chicken and vegetables from the pan and set aside.
Fry the Rice for Perfect Texture
Wipe out the skillet with a paper towel to remove any excess oil. Heat the pan over medium-high heat until hot, then add the 4 cups day-old cooked white rice, breaking up any clumps with a spatula. Let the rice fry undisturbed for 2-3 minutes—this creates a crispy, golden crust on the bottom, which is key to authentic arashi texture.
Stir in the 3 tbsp soy sauce and ½ tsp white pepper, mixing well to distribute the seasoning evenly. Cook for another 3-4 minutes, stirring occasionally, until the rice is heated through and the edges are slightly crispy. The rice should be hot but not dry—if it starts to stick, add 1-2 tablespoons water to steam it slightly.
Combine and Finish
Return the cooked chicken and vegetables to the skillet with the rice. Stir everything together and cook for 1-2 minutes until fully heated through. Drizzle 1 tsp sesame oil over the top and toss gently to coat. The sesame oil adds a nutty aroma and helps bind the ingredients together.
Taste and adjust seasoning—you may need a pinch more salt or soy sauce depending on your preference. Garnish with thinly sliced green onions and serve immediately while the egg bites are still crispy and the rice is hot. The contrast of textures—crispy egg bites, tender rice, and caramelized vegetables—makes this dish truly special.
Pro Tips For Making Arashi Fried Rice
- CRISP THE RICE FIRST: After spreading your day-old rice on a tray, microwave it for 30 seconds—just until the edges start to dry out. This jumpstarts the frying process so your rice doesn’t turn into gluey mush when you add the egg. I learned this the hard way after watching a batch of fried rice turn into a sad, sticky pancake.
- CHOP ONIONS SMALLER THAN YOU THINK: Arashi-style fried rice relies on even texture, so dice that yellow onion into ¼-inch pieces—smaller than a standard fried rice cut. The goal is for every bite to have that bright, sharp crunch without overwhelming the dish. (Yes, it’ll take 10 extra seconds, but your future self will notice.)
- SALT THE EGG BEFORE SCRAMBLING: Whisk your eggs with a pinch of salt before pouring them into the pan—this keeps the curds tight and prevents them from turning rubbery when they mix with the rice. I used to skip this, and my eggs always ended up too soft and clumpy.
- USE HALF THE OIL, THEN ADD MORE: Start with just 1 tablespoon of oil for the egg, then add another 2 tablespoons when you toss in the rice. This two-step method gives you better control over the heat and prevents the rice from steaming instead of frying. (Trust me, your pan will thank you.)
Flavor customization for this dish
Spicy Kick Options
For heat lovers, add 1 tsp gochujang (Korean chili paste) or ½ tsp chili crisp to the rice during the final stir-fry. The gochujang adds a fermented depth, while chili crisp delivers smoky heat. If you prefer fresh heat, mix 1 tsp finely chopped Thai bird’s eye chilies with the garlic before sautéing. 🌶️
Sweet Glaze Twist
Swap the mirin for 1 tbsp honey or 1 tbsp maple syrup to create a caramelized finish. After combining all ingredients, cook for an extra 1-2 minutes until the rice glistens. Top with toasted sesame seeds for crunch and a nutty aroma. This works especially well with pork or shrimp instead of chicken.
Umami Bomb Additions
Boost the savory depth by adding 1 tbsp fish sauce (like Red Boat) or 1 tsp mushroom powder (like umami-rich shiitake powder) to the rice. For extra richness, stir in 2 tbsp finely chopped scallions and 1 tsp toasted nori strips during the final toss. These ingredients elevate the dish without overpowering the crispy egg bites.
Herbaceous Freshness
Brighten the dish with 1 tbsp chopped cilantro or 1 tsp minced Thai basil at the end. For a more aromatic touch, add 1 tsp grated fresh ginger to the garlic while sautéing. These herbs cut through the richness and add a refreshing finish. Garnish with extra herbs before serving for a pop of color.
Crunchy Toppings
Add texture with ¼ cup crushed peanuts or 2 tbsp fried shallots for a crispy contrast. For a Japanese-inspired crunch, sprinkle 1 tbsp furikake seasoning (like Kikkoman) over the top. These toppings should be added just before serving to maintain their freshness and crunch.
Smoky Charred Notes
For a smoky twist, char 1 clove garlic and ½ tsp red pepper flakes in a dry skillet until fragrant, then mash into a paste. Stir this into the rice during the final 1-2 minutes of cooking. The charred garlic adds a deep, smoky complexity that pairs beautifully with the crispy egg bites. 🔥
Nutrition facts
Frequently asked questions about Arashi fried rice
Why does the recipe call for day-old rice?
Day-old rice is slightly drier and separates more easily when stir-fried, creating that signature crispy texture. Freshly cooked rice releases too much moisture, turning the fried rice mushy. If you must use fresh rice, spread it on a tray and refrigerate for 2+ hours to dry it out first. The texture difference is dramatic!
Can I make the egg bites ahead of time?
Yes! Cook the egg bites up to 1 day ahead and store them in an airtight container in the fridge. Reheat in a dry skillet over medium heat for 1-2 minutes per side to restore crispiness. For extra crunch, broil for 30 seconds before serving with the fried rice.
What's the secret to crispy egg bites?
The key is using cold eggs from the fridge and cooking them on medium heat until just set but still tender inside. Avoid overcooking—they should be golden brown with a slight crisp on the edges. The thin, even layer in the pan creates perfect cylinders that hold their shape when rolled. Pro tip: Use a nonstick skillet for easy flipping!
Can I substitute chicken with another protein?
Shrimp (12 oz) or pork (1 lb ground) work beautifully. For shrimp, sauté until pink (2-3 minutes), and for pork, brown thoroughly before adding to the rice. Beef (½ lb sirloin) needs extra cooking time—slice thinly and cook until fully done. The protein should be tender but not overcooked in the final stir-fry.
How do I fix fried rice that's too dry?
If your rice turns out dry, don't panic! Add 1-2 tablespoons water or chicken broth to the pan and cover for 30 seconds to steam. Stir well and cook uncovered for another 1 minute to evaporate excess moisture. For extra richness, drizzle with ½ tsp sesame oil or a splash of soy sauce. Prevention tip: Use slightly less oil when frying the rice.